Now Reading: How to make creative mason jar pendant lights at home
-
01
How to make creative mason jar pendant lights at home
Mason jar pendant lights are what happen when humble glass jars decide they’re done storing pickles and ready to star in your home decor. They’re rustic, affordable, weirdly charming, and powerful enough to make a plain ceiling feel like a designer lighting moment. If you like your lighting with character and a little comedy, you’re in the right place.
We’re walking through materials, tools, step by step instructions, pro tips, variations, style options, and those real life mistakes nobody likes to admit. Grab a coffee and maybe a bandage. Diy has consequences.
Why mason jar pendant lights are a brilliant (and slightly mischievous) idea
There’s a reason mason jar pendant lights have taken over farmhouse kitchens in texas, loft apartments in brooklyn, and cozy california coastal homes. They hit that perfect sweet spot between rustic lighting and modern charm. They cost less than designer fixtures, yet somehow look like you paid triple. Also, they make guests say things like, “wait… is that a jar?” Which is always fun.
Now let’s build one.
Materials needed for mason jar pendant lights
To get your mason jar pendant lights off the ground, you’ll need:
- Mason jars with lids wide mouth works best
- Pendant light cord kit with socket
- Edison style led bulb warm white gives the best glow
- Ceiling canopy kit
- Electrical wire connectors
- Rubber grommets for safety
- Spray paint or metal finish if you want extra flair
This is budget lighting at its finest. You can source most of this from local hardware stores across the usa or online without selling your soul.
Tools needed
You don’t need a full workshop. For clean and safe mason jar pendant lights, gather:
- Power drill
- Step drill bit for cutting metal lids
- Screwdriver set
- Wire stripper
- Safety gloves and goggles
- Measuring tape
If you skip the safety gear, the project may still work but your fingers might not forgive you.
Step by step instruction
Let’s build mason jar pendant lights without electrocuting ourselves.
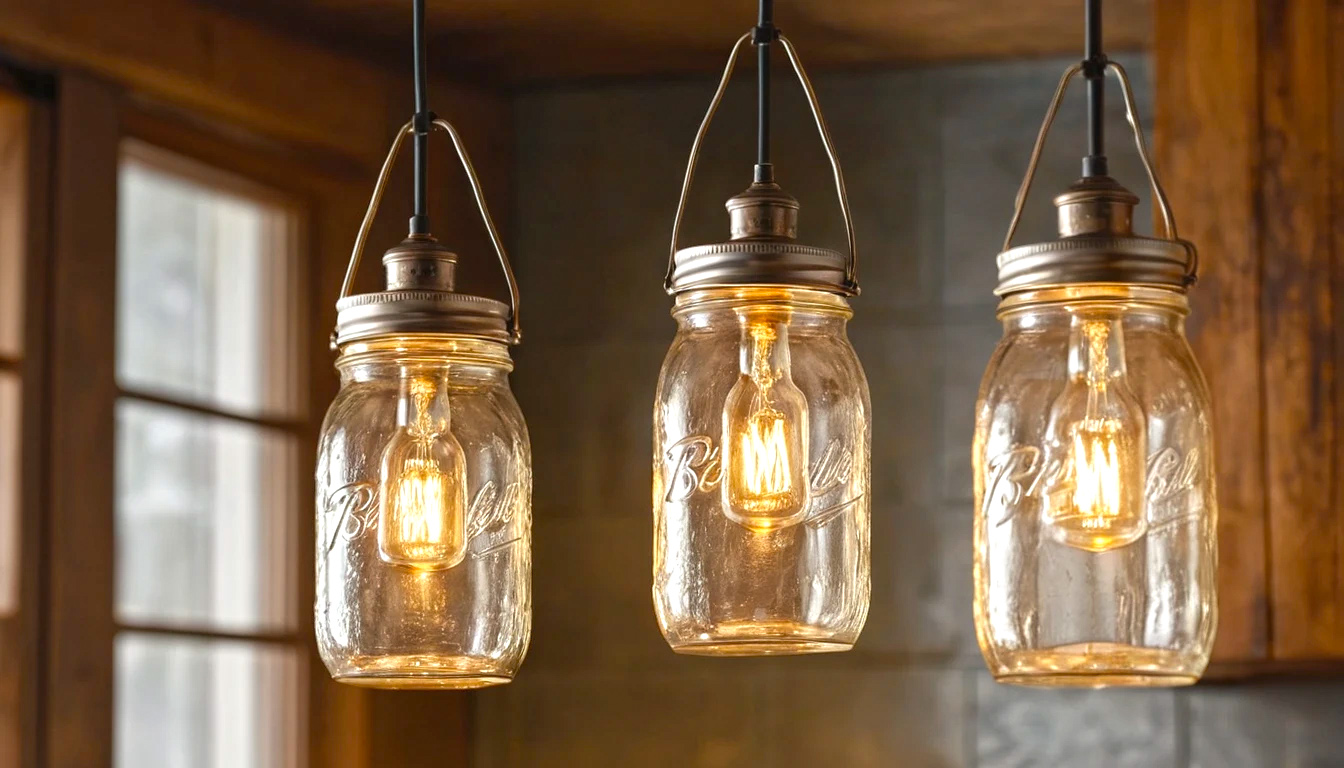
1. Drill the lid
Drill a centered hole in each mason jar lid using a step bit. Go slow. Metal heats up fast and likes to bite back.
2. Insert the socket
Slide the socket through the lid hole. Secure it tightly with the socket ring.
3. Wire the pendant cord
Strip the wire ends, connect them to the socket terminals, and tighten firmly. Loose wires create flickering and not the romantic kind.
4. Add the grommet
Slip a rubber grommet into the lid hole to protect the wire from sharp metal edges.
5. Screw in the jar and bulb
Twist the mason jar onto the lid and install the bulb.
6. Mount to the ceiling
Connect the pendant to your ceiling wiring using the canopy kit. Turn on the breaker only after double checking everything.
At this point, mason jar pendant lights officially enter your home as functional art.
Pro tips for mason jar pendant lights
- Use dimmable led bulbs for adjustable mood lighting.
- Frost your jars lightly for softer light diffusion.
- Keep cord lengths consistent for a polished multi light setup.
- If your ceiling is low, use mini jars to avoid fore head level lighting incidents.
What this really means is your mason jar pendant lights can go from cozy dinner glow to task lighting with one smart bulb choice.
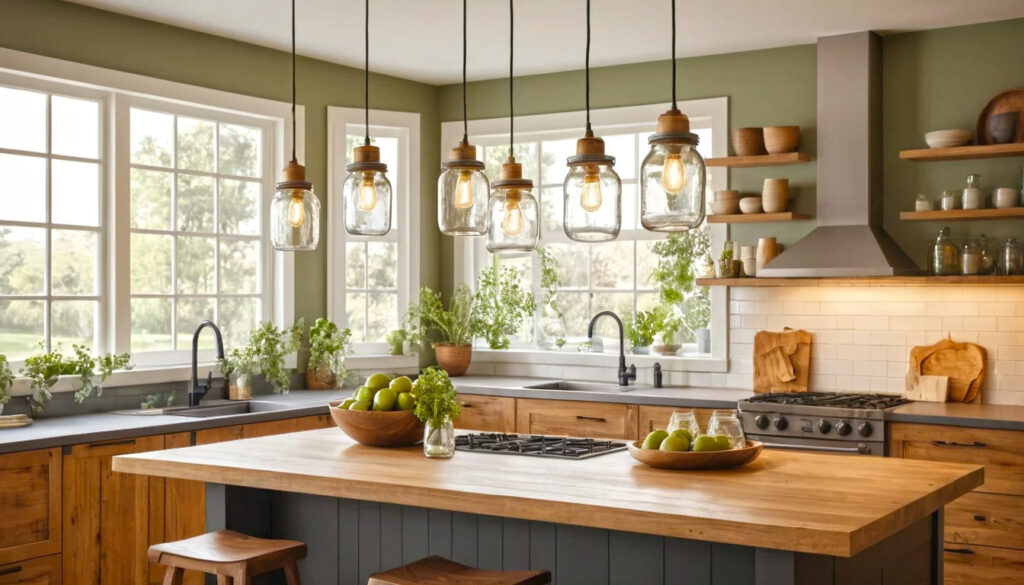
Variations for mason jar pendant lights made from reclaimed wood
Yes, this is where pallet wood sneaks in for a crossover episode. Mounting mason jar pendant lights on a reclaimed wood beam creates a statement piece that works beautifully over dining tables and kitchen islands.
Popular variations include:
- Triple jar wooden beam fixture
- Staggered jar cluster on a rough wood slab
- Single oversized jar with a thick rope suspension
Farmhouse meets industrial. It’s a love story written in sawdust.
Design or style options for mason jar pendant lights
This is where mason jar pendant lights really flex their design muscles.
- Farmhouse style: clear jars, black metal hardware, warm edison bulbs. Perfect for southern kitchens.
- Industrial loft: smoked jars, steel cords, brighter bulbs for task lighting in urban spaces.
- Coastal style: lightly blue tinted jars with white cords for breezy beach vibes in florida or california homes.
- Boho look: twine wrapped cords, amber glass jars, soft glow bulbs.
These lights are shape shifters. Dress them up or strip them down. They behave either way.
Real life mistakes and solutions
Here’s where reality checks in. Most mason jar pendant lights disasters fall into these categories.
Mistake 1: overheating
Using old school incandescent bulbs turns your jar into a tiny oven.
Solution: always use led bulbs.
Mistake 2: uneven hanging heights
Your lights end up looking like they lost a bar fight.
Solution: measure twice before cutting cords.
Mistake 3: flickering bulbs
Loose wiring is the usual culprit.
Solution: tighten connections and double check the socket terminals.
Mistake 4: too much glare
Clear jars plus bright bulbs can be blinding.
Solution: frosted jars or lower lumen bulbs fix this instantly.
Every lighting mishap is just a future lesson with better ambience.
The glow up verdict
Mason jar pendant lights work because they don’t try too hard. They’re simple, nostalgic, and ridiculously adaptable. They suit small apartments, big farmhouses, kitchen islands, coffee bars, and even covered patios across the usa. They save money, spark conversation, and make your ceiling feel intentional instead of forgotten.
And the best part is, you built them yourself. Slightly crooked lid? That’s character. Tiny finger print in the paint? That’s authenticity. A faint memory of electrical panic? That’s diy pride. If your ceiling feels dull, your lighting budget feels tight, and your creativity feels restless, mason jar pendant lights are ready for duty.